Database Synchronization
Before you start sending out events and user updates, we firstly need to integrate historical data into the StopChurn system, as it needs to be aware of all of your existing data, so then you are able to segment and filter users properly.
Uploading Files
As we have previously created our table definitions we now need to extract the historical data in the same format as the table definitions. Each document should also contain a few additional fields.
- Example:
{ "data": { "id": 123, "email": "john@doe.com", "phone": "+381638538392", "marketingPreferences": { "email": true, "phone": true }, "systemPreferences": { "email": false, "phone": true }, "firstName": "John", "lastName": "Doe", "city": "Limassol" }, "createdAt": 1696814606000, // Time of document creation in ms "updatedAt": 1696821819000 // Time when the document was updated in ms } - All that needs to be done is extract the data that you wish into json files (up to 2GB per file), which will contain historical data of your documents. Make sure to keep the data within each document tied to one table and one brand, as you will be selecting the table and brand for each document that you upload via the Back Office.
- An example of a ‘user’ table json:
[ { "data": { "id": 123, "email": "john@doe.com", "phone": "+381638538392", "marketingPreferences": { "email": true, "phone": true }, "systemPreferences": { "email": false, "phone": true }, "firstName": "John", "lastName": "Doe", "city": "Limassol" }, "createdAt": 1696814606000, "updatedAt": 1696821819000 }, { "data": { "id": 123, "email": "mark@zoe.com", "phone": "+381638538393", "marketingPreferences": { "email": true, "phone": true }, "systemPreferences": { "email": false, "phone": true }, "firstName": "Mark", "lastName": "Zoe", "city": "Larnaka" }, "createdAt": 1696821920000, "updatedAt": 1696822606000 } ] - You can attach as many files as you need for the synchronization process, all you need to do is navigate to
Database > Sync Database. - Once you reach the page you will need to firstly upload your json files via the json uploader, then once you are ready click on the ‘Sync With DB’ and wait for the integration process to finish.

DB Synchonization endpoints
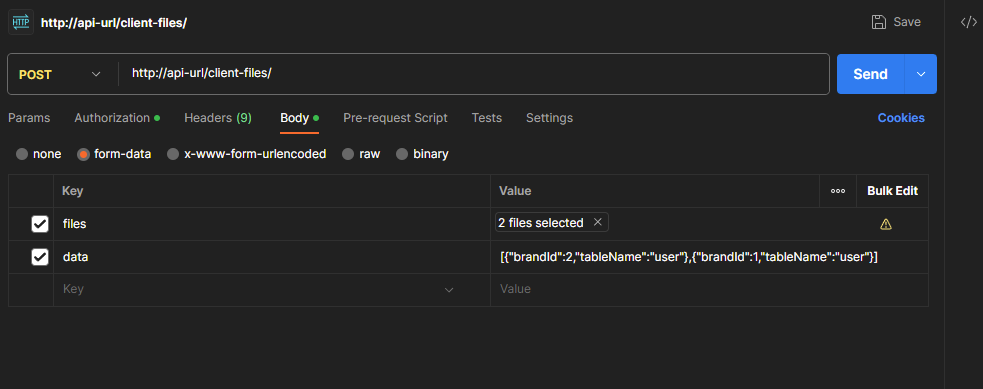
Files could also be sent to the /client-files route using the POST method, with the standard authorization mentioned at the start of the documentation. In the form-data ‘files’ key should have type ‘File’ and contain integration JSON files explained in this section. The ‘data’ key should contain array of objects with ‘brandId’ and ‘tableName’ properties. Each object of ‘data’ array should contain brand and table name data for the corresponding integration JSON file. The first object corresponds to the first JSON file etc.
Uploading files via endpoint example
Possible responses for uploading files
- 200 OK – Success
{ "statusCode": 200, "message": "Files Uploaded Successfully" } - 206 Partial success – If there were errors regarding JSON format, files with errors will be skipped and their list will be in the response message
{ "statusCode": 206, "message": "Files uploaded partially, skipped files: SkippedFilesList" } - 401 Unauthorized
{
  "statusCode": 401,
  "message": "You are not allowed to perform that action",
  "error": "Unauthorized"
}
Triggering data sync
Data sync for all JSON integration files is automatically triggered after receiving files. After the sync process is finished you will receive a POST callback on the Database Sync Status Endpoint (configured in Brand). The payload signature security method is implemented for every callback.
Examples for Data sync status callback
You can ignore the timestamp field since it is being used only for payload signature purposes.
- Successful database initialization
{ "data": { "status": 200, "timestamp": 1708611945206 }, "signature": "0fb749acc842160125123723ff37b056fea599115bc077af8be1dee354db7aeafc3351ceb084ca30e2640257e0e8c370368a30d3aae2a3c88489039ed23709f7" } - Error during database initialization
{
  "data": {
    "status": 400,
    "timestamp": 1708611945206
  },
  "signature": "53e05b09f711a54c15e2b1faa93f6fe19041b0f5fb1923d954ffbae974b2339eb5e7e5a352c45f05a70344a0bc4dcf3eda3b604450d049bec6cf40f2bdcb188f"
}
Integration Error Logs
If you receive a callback which indicates that some errors have ocurred during database initialization, you can fetch error logs for the last database initialization by sending a GET request to the /client-data/integration-errors using the POST method, with the standard authorization mentioned at the start of the documentation. The response of this request should be an URL which leads to downloading the latest database initialization error logs.
Synchronizing Brand IDs
For each new brand on the StopChurn you will receive a POST callback on the Brand Creation Endpoint (configured in Brand). This way you can map StopChurn brands to the brands in your system. The payload signature security method is implemented for every callback.
Example for new Brand creation callback
{
  "data": {
    "stopChurnBrandId": 15,
    "brandIdFromClient": "550e8400-e29b-41d4-a716-446655440000"
  },
  "signature": "13056bc348df3d3f86fbea10e072ad01a25ecf39f5c2c9f3e05050a1f851e0e6ae8ee4a9153980da3922ff1ca0d722c5c42d714bc7f823684a26469314860b36"
}